COMPASS + TEMPERATURE
USER GUIDE
ENGLISH
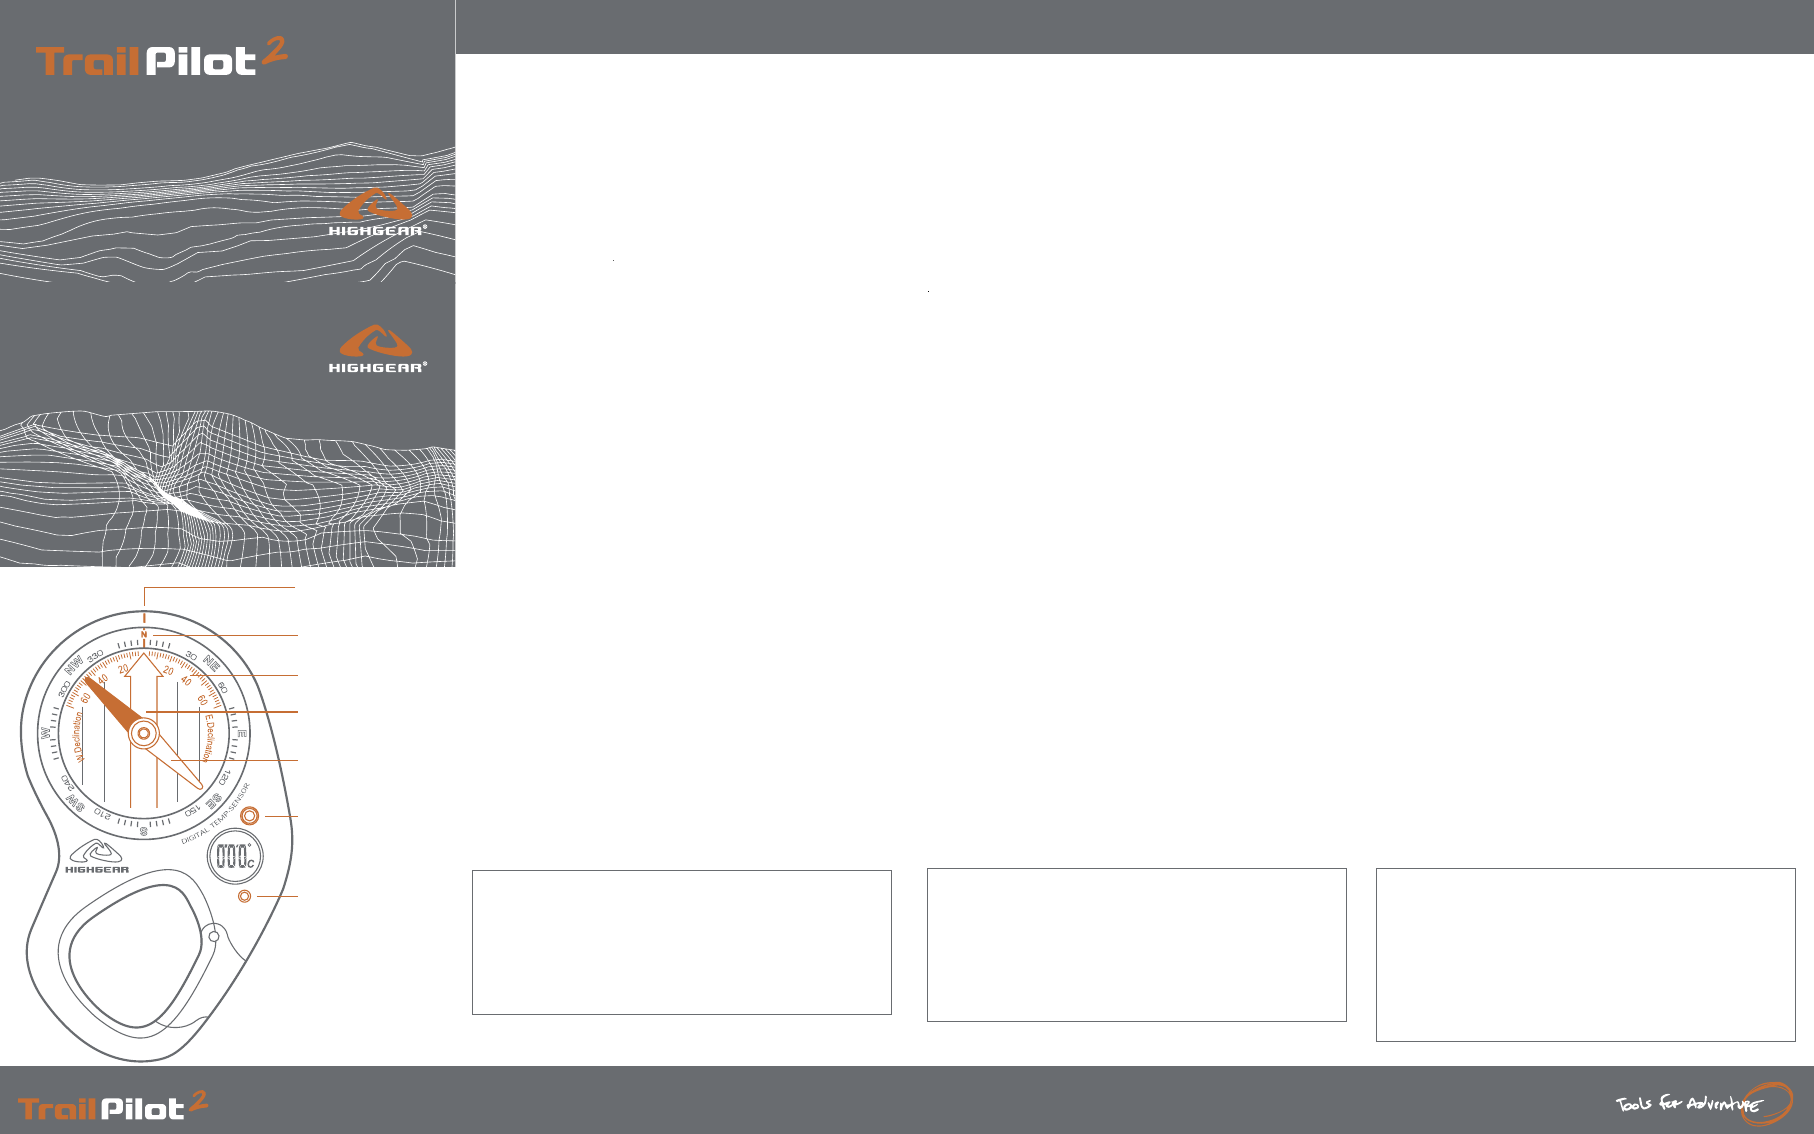
Congratulations on purchasing the TrailPilot 2. The TrailPilot 2
is an analog compass featuring digital thermo-sensor technol-
ogy. Please take a few minutes to familiarize yourself with the
TrailPilot 2.
TEMPERATURE
1 Press and hold BUTTON S1 for 3 seconds to view the temperature
reading as ˚F or ˚C.
-
TO LEARN WHAT DIRECTION YOU ARE HEADING:
1 Hold the TrailPilot 2 as level as possible, with the DIRECTION
ARROW aimed in the direction you are heading.
2 Rotate the silver bezel until the red end of the needle rests
inside the ORIENTING ARROW, with the red tip pointed at the
“N” (or for varying declination areas, with the red tip pointed to
your local area’s declination on the capsule’s declination scale.
3 The direction you are traveling can now be determined by read-
ing the silver bezel at the DIRECTION ARROW.
TO SET YOUR PATH TO A SPECIFIC DIRECTION:
1 Rotate the silver bezel to align your desired heading with the
DIRECTION ARROW.
2 Holding the TrailPilot 2 as level as possible, rotate the entire
TrailPilot 2 (and your body), until the red end of the needle rests
inside the ORIENTING ARROW, with the red tip pointed at the
“N” (or for varying declination areas, with the red tip pointed to
your local area’s declination on the capsule’s declination scale).
3 Now, the direction indicated by the DIRECTION ARROW is the
direction you need to travel.
TIP Once you know the direction you need to travel, rather than
trying to walk while constantly looking at the compass, it is
better to pick a point along the horizon in your path, and head
toward that point.
To find out more on declination, visit www.highgear.com,
“Support/Glossary” Section
FRANÇAIS
Félicitations sur votre achat d’un compas analogique TrailPilot
2 à technologie de capteur thermique intégrée. Veuillez prendre
quelques minutes pour vous familiariser avec le TrailPilot 2.
TEMPÉRATURE
1 Appuyer et maintenir la TOUCHE S1 pendant 3 secondes pour
afficher la température en °F ou en °C.
-
COMPAS
1 Tenir le TrailPilot 2 autant que possible de niveau, avec la
FLECHE DE DEPLACEMENT orientée vers la destination souhaitée.
2 Tourner la lunette jusqu’à ce que l’extrémité rouge de l’aiguille
se mette en place dans la flèche d’orientation. Le relève-
ment de la lunette qui s’aligne à la FLECHE DE DEPLACEMENT
représente la direction à suivre pour atteindre votre destination.
En utilisant le compas avec une carte, il est important d’ajuster
l’angle de déclinaison* afin de déterminer l’écart entre le Nord
géographique et le Nord magnétique. Pour ajuster la déclinaison,
il faut aussi connaître la déclinaison Est ou Ouest Pour en savoir
plus, visitez notre site Web à www.highgear.com.
Pour ajuster la déclinaison, tenir l’intérieur en plastique transpar-
ent du compas séparément de la lunette argentée. Faire tourner
l’intérieur du compas jusqu’à ce que le degré de déclinaison voulu
soit aligné avec le bas de la FLECHE DE DEPLACEMENT. L’AIGUILLE
point encore vers le Nord magnétique, mais la lunette représente le
Nord géographique.
> Pour obtenir une lecture de compas optimale, tourner
l’intégralité du corps en essayant de localiser votre destination.
> En localisant votre direction, si le TrailPilot 2 est tenu bien de
niveau, l’extrémité rouge de l’aiguille pointe toujours vers le
Nord..
.
*Declination: The difference in degrees, or angle, between
Map North and Magnetic North.
Map North: Also know as true North (North Pole).
Magnetic North: The geographical region toward which all
magnetic needles point. This point is 1300 miles South of
true North. [This is why it is so important to calibrate]
*Déclinaison: L’écart en degrés, ou l’angle, entre le Nord
géographique et le Nord magnétique.
Nord géographique: Aussi appelé Nord vrai (Pôle Nord).
Nord magnétique: La région géographique vers laquellepointent
toutes les aiguilles magnétiques. Cet emplacement est à 2092
kilomètres au Sud du Nord vrai. (C’est pour cela que le cali-
brage est essentiel.)
ESPANOL
Felicitaciones por su compra de una brújula TrailPilot 2. La
TrailPilot 2 es una brújula analógica que destaca tecnología
digital termosensible. Por favor, tómese unos minutos para
familiarizarse con la TrailPilot 2.
TEMPERATURA
1 Presione y mantenga presionado el BOTÓN S1 durante 3 segun-
dos para ver la lectura de la temperatura en °F o en °C.
BRÚJULA
1 Mantenga la TrailPilot 2 tan nivelada como le sea posible con
la FLECHA DE VIAJE indicando el destino hacia el que quiere
viajar.
2 Déle vuelta al anillo giratorio hasta que la punta roja de la
aguja se asiente dentro de la flecha orientadora. El rumbo en
el anillo giratorio, con el que se alinea la FLECHA DE VIAJE, es
el rumbo que debe conservar para llegar a su destino.
Cuando use su brújula con un mapa es importante ajustar su
declinación* para descifrar la diferencia entre el norte geográfico
(el indicado en el mapa) y el norte magnético. Para ajustar la
declinación también tiene que saber su declinación oriental u
occidental. Para aprender más acerca de la declinación, visite
nuestro sitio en la Internet, www.highgear.com.
Para ajustar la declinación, agarre el plástico transparente
dentro de la brújula por separado del anillo giratorio plateado.
Gire el interior de la brújula hasta que el grado deseado de
declinación quede alineado con la base de la FLECHA DE VIAJE.
La AGUJA sigue apuntando hacia el norte magnético pero el anillo
giratorio representa el norte geográfico.
> Con el fin de lograr una lectura más precisa con su brújula,
gire todo su cuerpo al localizar su destino.
> Al localizar su dirección, si la TrailPilot 2 se mantiene com-
pletamente nivelada, descubrirá que la punta roja de la aguja
siempre apunta en dirección al norte.
* Declinación: La diferencia en grados, o ángulo, entre el norte
geográfico y el norte magnético.
Norte en el mapa: También conocido como norte geográfico
(Polo Norte).
Norte magnético: La región geográfica hacia la cual apuntan
todas las agujas magnéticas (imanadas). Este punto está a
2,092 kilómetros (1,300 millas) al sur del norte geográfico.
[Es por ello que es muy importante calibrar.]


 (2 Seiten)
 Manymanuals.com
 Manymanuals.de
 Manymanuals.fr
 Manymanuals.it
 Manymanuals.pl
 Manymanuals.cz
 Manymanuals.es
 Manymanuals-pt.com
Kommentare zu diesen Handbüchern